
My Big Creative Project could also be titled “A Life Lesson in Perseverance, Not Giving Up or Seeing Things Through to the End.
My blog about my Big Creative Project is lengthy, so I’ve provided a snapshot of Before / After pics below and you can scan the rest of my post to see all of the individual room Before / During / After pics:


In September of 2018, I was offered an amazing job opportunity seven states and 1,800 miles away from where I was living at the time. After pondering my options carefully, I chose to accept. I was coming off the heels of running my own digital consulting business, which supported my love of working for cultural and environmental nonprofit organizations through my photography and documentary films. It was a relatively low point in my life. My heart and soul belonged to my creative work, but my ability to live and sustain myself came from my digital consulting work. Clients were becoming more difficult to find and I was spending all day working on my existing clients and nights/weekends on acquiring new clients and hardly any time was left over for what I cared about the most. Eventually, my clients started to dry up and I knew I needed to go back to steady work and a consistent income.
One of the deciding factors in the move was the fact that the company hiring me was located in a small town in the MidWest. My roots come from the MidWest (I was born in WI and raised in upstate MI) and I missed the small town values and change of seasons. So I accepted the offer. You see one thing is clear, when facing great change, risk is easy to accept when you’ve basically got nothing else to lose.
I interviewed late in the week and accepted the job offer on a Friday. I delayed my flight home so I could find a place to rent until I got to know the city and where the best place to live would be. But God had other plans for me. First, no one wants to rent to someone who’s worked in animal rescue and has an entire fur baby family (at the time, I had two dogs and three cats) and two, Ball State University has a lock on the Muncie rental market. Students signed leases for 2020 in August of 2018, so I had arrived just after a two-year shut out on the best houses for rent. The ones the real estate agent showed me were either in shockingly bad locations, in shockingly disgusting condition or exorbitantly expensive for the crap shape they were in.
I was feeling a bit dismayed, because I like structure and wanted to shore up my housing situation before heading back west. Also, the offer date was to start three weeks from then, so I had to move quickly. I called my boss-to-be and she said, “Hey, why don’t you go check out the Old Washington Street Festival. Sometimes they put houses on the market this time of year and you might be able to score a historic home for a great price.” So, late on a Saturday afternoon, feeling dismayed by the real estate rental market situation, off I headed to the festival. I still remember where I parked and the feeling of hope as I walked down the street of the Emily Kimbrough Historic District.
One thing I want to share is that nearly every major mistake I’ve made in my life in the past decade or so has been from not listening to my women’s intuition. And every place I’ve ever lived in the past two decades, I knew from moment I walked up to the front door that the place would be mine (even before seeing the inside of the house.) This was true for all the fab places I’ve lived, such as: New York City, Santa Monica, CA, Ojai, CA, Ashland, OR and Cave Creek, AZ. I was thinking about this as I entered the festival and less than one block in, there she was, my old beauty, just waiting for me. She is an Italianate house built in 1874, nearly 150 years old now. And I knew the moment I gazed at her from the street that A) I wanted her and B) she was meant to be mine. Fortunately, the realtor was having an open house, so I went in. The house was buzzing with people and I was terrified it would be overwhelmed with offers and I would lose it. I called my boss-to-be yet again (remember, she doesn’t even really know me yet) and asked that she and her husband come to the house to look at it with me and assess the value. She readily agreed.
When they arrived, I was sitting in the hot September sun on a bench in the front yard. She said “you look like you own the place already.” And my response was “That’s because I already know she’s gonna be mine.” I put an offer in that day, after having only looked at the house for less than an hour and flew back West. I completed the entire purchase and close process, including inspections remotely. I let my heart get the better of my sensibility. My enthusiasm won out over reason. Realtors (and others) can smell an opportunity from a mile away and I believe consciously, or unconsciously take advantage of the situation.
I had zero experience with old houses, but I wanted her and the only thing I cared about in the inspection report was whether or not the foundation was solid. I overlooked all the details and possible future expenses, because I was in fear of not getting what I wanted should I point out my concerns. I negotiated without a realtor representing me. (I also do not recommend this either.) I only looked at the surface level of the house and did not consider what kind of work might lie ahead of me once I moved in. It was relatively freshly painted, seemed to be in good shape, had a decent inspection report – so I bought and closed on the house and took possession in October of 2018.
Here are the initial photos I quickly shot with my cell phone on the day I took possession. I still love the old world details:
CLOSING DAY
")
")
")
")
")
")
")
")
")
")
")
")
")
")
")
")
")
")
")
")
")
")
")
")
Hoosier hospitality is real. I knew I moved into the right neighborhood when my next door neighbor brought me warm, fresh out of the oven oatmeal raisin cookies on move in day. First of all, oatmeal (and ginger) are my favorite cookies. Second of all – who does that in this day and age? I knew we would be friends from that point on and so we are . A few days later on Halloween night, another neighbor noticed that I worked all day, came home from work, immediately started handing out Halloween candy (without a break in between) and when she saw my light shut off from running out of candy, came over, knocked on my door an invited me to dinner with she and her husband. That would NEVER happen in LA, I’m telling you, probably not in AZ or NYC either. What I didn’t know then, was that my house was about to become my greatest source of joy and frustration in this lifetime, what was also true was that I had hit the neighborhood jackpot.
People that own and love old houses know how much work they are and they help each other and that is true of my neighbors. I’ve met or become friends with nearly every neighbor up and down the block on both sides of the street for three full blocks. I lived in LA nearly a decade – maybe knew one neighbor, lived in Cave Creek AZ for 4 or 5 years and didn’t even know a single neighbor’s name! I am so grateful the people of this amazing community welcomed me with open arms.
Once in the home, I decided to make it mine. And thus began my Big Creative Project. I embarked on something I had no idea would be so big, so overwhelming, so scary or so long-term. When they say “ignorance is bliss” they mean it. Had I known two and a half years ago what I was about to embark upon, I probably would have tucked tail and run for the hills.
But what is done, cannot easily be undone. Once in the house, I began to notice all the things in the inspection report that I had missed, that I had not looked at closely enough to realize the potential cost to repair and also, much more importantly, all the things that needed to be fixed that were NOT in the inspection report!
One thing I’ve learned from years of working in Corporate America is that, when faced with a very large project, the easiest way to keep from being overwhelmed is to break it down into smaller pieces and to do what Henry Ford did when building the Ford Motor Company – consult people more experienced and smarter than you.
Before embarking on my journey to make the house my home, I called in a couple of contractors about surface level work I wanted to have done. Most of it was fixing wall cracks or HVAC leaks. I got estimates ranging from $25K-$50K. Given that Muncie was devastated by the fall out from the economic crash of the motor and manufacturing industries, I couldn’t really justify spending that kind of money, because there would be no way I could guarantee I would get the equity back if/when I sold the house in the future. So I began doing research – lots and lots of research about old houses and how to fix them. I binge watched DYI YouTube videos before beginning.
My sister Renee called my beginning the work “pulling a thread.” Once you pull a thread on a sweater, it just pulls and pulls and continues to unravel. There’s no stopping it until you cut the thread. Well, here I am three years later and I’m still pulling that thread! I’m not sure if the work will ever be done. The inspiration and fulfillment from achieving something I could never ever have dreamed of has been so rewarding. In some ways, I don’t want it to be done. But I’m getting close…
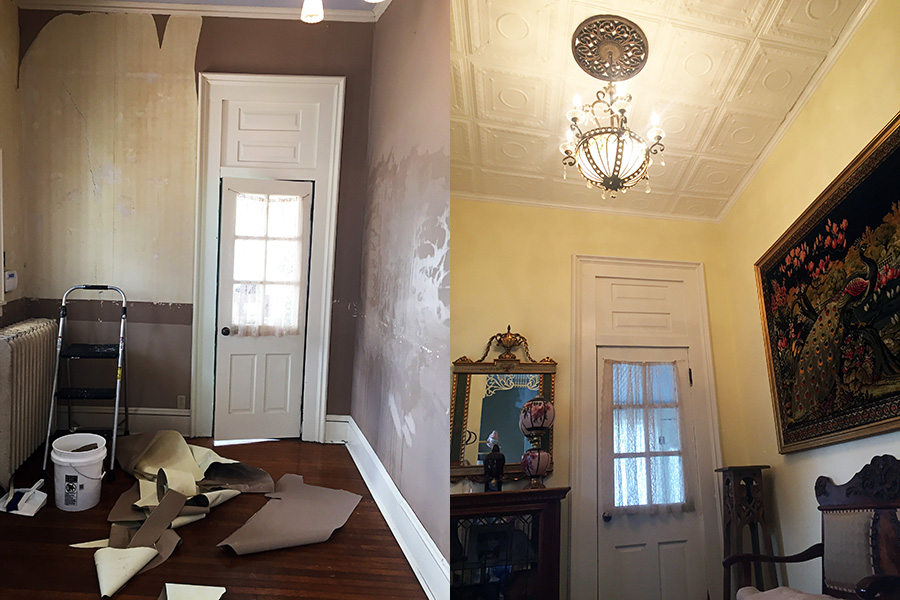
The First Room – The Foyer
I started my journey in the foyer. A simple enough task. I thought I was simply going to remove the wallpaper and repaint. Ho, ho, ho. How naive I was! First of all, wallpaper on plaster acts almost as its own restraining protection. It’s kind of like an extra layer of joint compound keeping the plaster in place. Second of all, it can be very, very, very difficult to remove (that’s a story for later on).
I was lucky in one way, in that when I started pulling the wallpaper down from my nearly 12′ ceilings, it came off in very large strips, whole pieces actually. Yippee! That room had been painted so many times that the wallpaper was “ready” to come down. My elation at how easy it came down was quickly replaced by dismay after it breaking off way above where I could reach, and even worse, at the large floor-to-ceiling plaster cracks that were now visible. They were huge!
While looking at the cracks and the ceiling (my house was wallpapered head-to-toe, including the ceiling), I noticed that the foyer light was hanging weird. A) I didn’t like the light, B) it wasn’t centered and C) it was not hanging right. I knew if I was going to get the rest of the wallpaper off the walls, off the ceiling and fix the ugly light, I’d have to get up high. I don’t like ladders and quickly realized, if I was going to do the work safely and more “easily”, I would have to get scaffolding.
I found a great used scaffold on FB Marketplace for a bargain $100 bucks and got the rest of the wallpaper down. When I got to the problem light is when I knew I was in trouble. It was hanging precariously from the plaster. It was not screwed into the lath! I mean what idiots in their right mind hung this ugly light? The weight of the light was pulling the plaster down from the ceiling! And then, when I removed the wallpaper from the ceiling, I found that a good 6’x4′ section of the ceiling had had some kind of prior water damage and the plaster could drop on my head at any minute. Umm – no, that was not noted anywhere in the inspection report. This was the beginning of me referring to my house as the “bitch.” Because she resisted my every attempt at beautifying her! So many obstacles along the way…
Thank God for Big Wally’s Plaster Magic! Their motto is “You can do this!” Their YouTube videos gave me the confidence to begin. Their plaster and wall repair kits are easy to use, albeit expensive. If I had known more about plaster back then, I would’ve realized you can get a giant bag of plaster from the hardware store for about 1/10 of the price. But hey, in this day and age, we value convenience and I needed a product I could quickly learn how to use.
I fixed the wall cracks first: removed the excess plaster, re-plastered, covered with joint compound, sanded, primed and painted. Ok. let’s be honest. I’m never going to be a professional plaster repair person. My application and sanding sucks – it leaves a lot to be desired and it’s never going to be perfect. I wasted an ENTIRE container of plaster because I didn’t understand the difference between set time and working time and the plaster hardened before I could use it all. And the paint job. I thought I picked lovely pale yellow. But no matter how pale it looked on the little paper paint strip, it looked like lemonade after I painted. I ended up blending in white to make it more pale after a friend commented that my foyer looked like a little kids room (NO one wants to hear that) and I ended up repainting it three more times to try to get the color right. But I did it! ME. My team of three – me, myself and I learned a lot from this first project and for that, I’m very proud.
I did the easy work first before tackling the ceiling. I still can hardly believe to this day that I went after that ceiling. I remember that first day like it was yesterday. I was standing on the scaffolding, over 10′ above the ground and my legs were literally shaking. I was nearly crying and on the verge of a panic attack. All of the blog writers that I had written to recommended that I get a contractor to fix it. They all said – rip the entire ceiling down and replace the plaster with drywall. Or, you need a contractor, because it looks like that ceiling is coming down. Excuse me? No, I don’t want dry wall in my old house. I want plaster. It’s sound proof and insulating and I did not want to destroy the integrity of my home. And I couldn’t afford the contractor’s outrageous quotes/prices, so I got up on that scaffolding, uber-determined and yet utterly terrified that I would pull the whole ceiling down on my head. I blasted the Classic Vinyl channel on Sirius XM to get the voices out of my head that told me I couldn’t do this, that I wasn’t experienced, that it was too dangerous, that I should leave it to the professionals, blah, blah, blah, blah. (I’ve listened to that channel through nearly every job ever since.) And I started with pulling that thread my sister talked about – that one small string – the first piece of plaster that had to go down. And when I pulled it, it brought a giant hunk of plaster down and it hit my hardwood floors HARD with a loud thud and I was instantly grateful that it didn’t kill or maim any of my fur babies. I got down off the scaffolding and put them somewhere safe and restarted. Once I got through the first few pieces and learned the weight of the plaster it got easier. I was still really scared, but I had pulled that thread and started and now I was determined to finish. The more I worked, the more my confidence in my ability to do it myself grew.
It took me five long months of working nights and weekends to complete the job. And despite wearing a hazmat suite and N-95 mask, I still exposed myself to black mold poisoning in the process. While the ceiling has been remediated, my body is still healing from the mold poisoning (mycotoxic mold poisoning my doctor calls it. It can affect your brain, your neurons, has caused insufferable fatigue, etc.). This hasn’t been easy and as I said above, it’s not done perfectly, but hey – it’s done and it looks beautiful to ME and I’m healing. Realize when working on your old house – no one else’s opinion matters except your own. It’s your house. Own it. I mean, really own it!
After I re-plastered and repainted the ceiling, I realized that it was not laying as flat as I wanted it to. I really, really, really, really wanted to put up real tin ceilings to cover the wavy areas. But to hang them, you have to screw plywood into the lath over the plaster. Seems simple enough right? Not so! I could not find a single construction company, roofer, handyman, anyone within a 100-mile radius who was willing to help me hang plywood onto my ceiling. They want the big jobs, not the little ones and they want work they are familiar with (MHO – my humble opinion). So I had to find a creative solution, which I found in glue-up tiles through Decorative Ceiling Tiles. I found the coolest ceiling tiles that you can paint and glue up or buy pre-painted and glue up. I bought the first batch unpainted and painted them in my garage. TIP: spend the extra $2 bucks per tile to have them painted for you. The moment wind got under my garage door, it blew dust all over my not yet dried paint. What a PITA to fix.
Anyways, here is the final job. I regret I never took a whole picture of the entire foyer or the hideous hydrangea themed wallpaper that was overlaid the other wallpaper, but you’ll still get a sense of my beginning of my DYI journey. I think I’m doing pretty well so far, and my cat Rembrandt agrees.
THE FOYER


THE KITCHEN SAGA
Where do I start with the nightmare called my kitchen? Let’s go back a few months and start with day 1 of move in. I was upstairs in the bathroom and noticed the former owners left a trashcan behind. It had some bird seed in it and out of the corner of my eye, I caught movement. I thought, did I just see something move? I went to investigate it and found a teeny tiny cute mouse was stuck in it. I felt so bad for the poor little mouse. At least he had some foodies right? Wrong. I didn’t want to kill a living creature (then) and brought him outside and released him. What I didn’t know, is that all his family, friends and relatives were living in my house: in my basement, under my kitchen sink, under my dishwasher and as I was soon to find out – IN MY OVEN! Yes, that’s right my oven. This is the point I began to ponder how the house passed inspections. I will never again buy a house without spending the additional $1,000 bucks to get a pest and mold inspection. It’s simply not worth it to bypass this expense.
At the time I moved in, I had three cats, so I didn’t think much of it. I had no clue there was a potential mouse infestation. I figured, if I saw one mouse, the cats would catch the rest. They have one job – could they do their job? NO! The dogs caught a mouse though. I put traps in the basement with peanut butter. I refused to use the sticky traps – way too inhumane, and I couldn’t try the sonic kits because of my fur baby family. How I learned that I had a real issue was when I finally decided to bake something. I’d been using the gas oven range to make tea and other simple dishes and it worked fine. But when I put the oven on, the entire kitchen began to smell like cooked pee. PEE! I searched high and low and couldn’t find anything. I thought maybe one of my pets had an accident. Nope, no accident to be found. So finally one day, I realized it was coming FROM THE OVEN. The worst possible thing you can imagine, is having guests over for dinner. But rather than them smelling the delicious food you’re baking, they instead get the visual of a NYC subway in summer time. I had to find that pee!
I found a hole in the back of the wall behind my cupboards and I chopped up a bunch of Irish Spring soap, rammed it in the hole and then covered the hole with steel wool. My research told me, mice would eat through walls, but not steel wool. That did not solve the pee smell problem.
I scrubbed out every single cupboard and drawer, replaced all the mats, used nice smelling wood cleaner. That did not solve the pee smell problem. I was glad I did it though, because the cupboards were disgusting. How anyone put their dishes in there, I’ll never know.
After about two weeks, it dawned on me to pull the oven out. Behind the oven, I found two spots where the former owners had put down steel wool. This told me two things 1) They knew there was a mouse problem. 2) They did not report it in the real estate disclosure paperwork. So I started the process to research to sue for real estate fraud. Unfortunately, I learned that Indiana is a buyer beware state. I had bought the house long distance quite quickly, had a proxy stand in for inspections, did not purchase the more thorough pest inspection and I couldn’t prove the owners were trying to be deceptive to sell the house. But I believe in my heart of hearts, they know and they know they know what they did to unload the house and move back to Santa Barbara, CA.
What I didn’t find was any evidence of mice pee (or poo) for that matter. So I let my nose do the investigating. I got down on all fours and started sniffing around like a dog. That brought me to the back of my oven. I could smell pee on the back of my oven. So I unplugged it. Got some tools, researched online to find the manual for my oven, watched some more DYI videos on how to safely remove the back of an oven, swore a LOT as I tried to remove the back of the oven. And then, there it was. The fucking motherlode. There was at least a half INCH of mouse shit and piss in the layers of the oven that sits between the oven itself and the burners. It was an area that mice had clearly infiltrated and been using for a long, long time. They had made themselves a very comfy cozy nest. I figure at this point, the former owners were bastard cheapskates and had taken the nice oven with them, or sold it, and bought this shitty used one , cause there’s no way they had been cooking with that thing or the mice wouldn’t have been living in it. Or maybe they just went out to eat all the time. Who knows? All I know is that I was thoroughly grossed out, worried about my personal health and knew I needed to do something. At first I wanted to just drag the entire oven out to the street. I mean, who wants to cook with an oven that’s been infiltrated by mice? I immediately stopped using the oven, went out and bought a hot plate and cooked on that for a couple of weeks. That was a bummer to say the least, but it worked. And then I started shopping for ovens and got sticker shock. I wasn’t in a position to pay a grand or more for a new oven. So, perhaps – against my better judgement – I decided to clean it. It was gross, disgustingly gross. I mean, that thing was a mess. So, I put gloves on, glasses on, an N-95 mask (this was pre-COVID, when you could still get them for personal house projects.). And I brushed a small mountain of mice shit out of my oven and scrubbed that bitch until it was clean. I bleached it all down and then self cleaned the oven. Why? Because the shit was in the area where no food item would touch it – below the burners / above the oven. And I figure any mice that were still living in there would be burned alive when I torched the self cleaner on.
It worked. I still use the oven today. I’m sure this thought grosses you out and yeah, it grosses me out when I think about it. But I’d rather spend $1K towards reframing my old windows, when I have an oven that’s usable and is now clean. That’s just me. When you have a really, really old house, with a lot of work to get done and very little money to put towards it, you gotta choose your priorities. My guess is, most people would’ve thrown out the oven or donated it.
The Oven Debacle


After cleaning out the oven, I became hyper-paranoid about mice and bound and determined to find every single spot they were using to enter my kitchen. It’s one thing to have mice live in your basement or your walls, but another thing entirely to think about the myriad of health issues of having mice in the place you cook and eat.
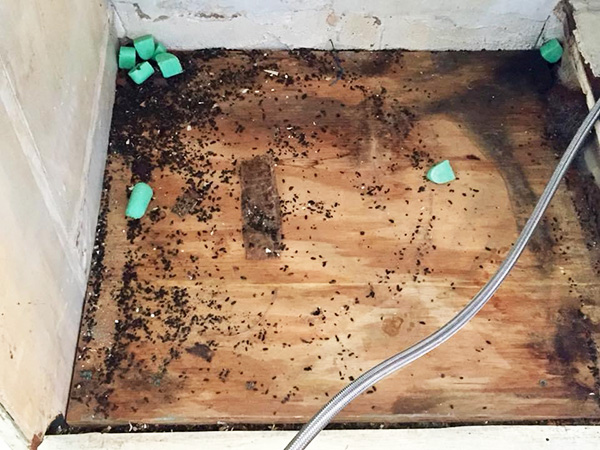
The next spot for me to check was under the kitchen sink. Found another hole and mice tracks and quickly filled it. The former owners told me the dishwasher was BRAND NEW. Barely used they said. So I didn’t think much about the dishwasher. But then at dinnertime, I started noticing the cats hanging out by the dishwasher. A red flag went up and this time I called in an HVAC person to remove the dishwasher. Sure as shit, literally, we found another treasure trove of mice shit. I mean about 2x the amount of the oven. I was so pissed! I cleaned up the mess, filled the holes and had the HVAC guy put the dishwasher back in. Hey former owners – I know, you know, you had a mice infestation. You had to have known there was an issue when you put the f’ng dishwasher in!
Tell me you didn’t know this was here? Look how old the damage is! Why wasn’t this in the inspection or real estate disclosures?
At this point, I started thinking about how to dump the house…err, I mean, remodel my kitchen on a $500 budget. Most kitchen remodels cost $50-$100K, so there was just a “little” gap there. The cupboards were plain, the hardware was ok. I wanted shaker doors that matched the period of the house. And so, I made them myself. I watched more DYI videos. I went to Menards (I should have stock in Menards, Lowes and Home Depot at this point – I’ve spent so much time and money there.) I found the kind of wood I needed, I bought a hand miter saw for $7 bucks and took the wood home and went to work.
The last time I worked with wood was when I was a pre-teen living in Upstate MI. My dad would work the power lines and he would take his van, with a trailer behind it to go cut wood for the winter. We had a wood-burning stove in our basement and this was no small task. I loved this task though. Riding on the trailer, being in the woods, feeling the cold air on my face, seeing bunnies or deer, the smell of nature, picking wild blueberries. These were some of the best times of my life…until we got home. Then the chain saw would start up and my dad would sweat and swear and cut bundles and bundles of wood. And all of us kids would stack it against the garage to make sure we had enough for winter. I think part of the reason I’m fit today is because of the hard work I did as a kid!
Needless to say, I don’t know a damn thing about cutting wood, planing wood, making wood look nice. I know less about kitchen cabinets or design. I just wanted my kitchen to look pretty. So I followed the directions I found on one of my Pinterest pins about farmhouse style kitchen makeovers. Here’s the result.
My Makeshift Shaker Cabinets


Let’s talk a little bit about painting. I’ve never painted a goddam thing in my life. I figured it would be easy. You look at pretty pictures on Pinterest of how you think you want your room to look. You go to Benjamin Moore or Sherwin Williams and you pick out paint chips. You come home and tape up all the little paint chips and then go and have a sample or two made and pick your color. Nope, doesn’t work that way. Ambient light, direct light, various lightbulb types, incandesence, LED, angle of light; it all impacts the final paint color. And what I’ve found is that the final paint color almost always dries darker than the paint chip. I painted my kitchen ceiling FIVE times to get it to not look gray. Granted, it started out as blue. So I used a color blocking primer and then ceiling white. That didn’t work, so decided to do a few extra coats of bright white. I did the purple dry to white. Screw that. It dried with a hint of purple in it. Painted it again. At first I chose coral for my kitchen. I have an old Victorian home. I figured bright cheery colors was the way to go. My friend – to remain un-named, snidely asked me if I wanted it to look “cheap.” I think she was trying to hint that it wasn’t the right color choice. Needless to say it hurt my feelings and at the same time, she was right! Yet I didn’t want to follow the trend that’s lasted way too long of gray, “grayge”. I hate it. I hate DRAB houses that are all gray. How much more blah can you get? No personality whatsoever. I don’t see the charm. Sure, maybe if I had a minimalistic multi-million home, I might want some nice neutral high-end colors. But not for a house with this much character. I figured I would paint the coral as an accent color and I chose a very pale yellow for the rest of the kitchen. Like the front foyer, it came out like a babies room. So I cut the yellow paint in half with white and painted it again. That barely worked. Then, to make matters worse, my cat James Bond, curious as to what I was doing, jumped up on the table where I had my paint tray laid out and LANDED IN THE PAINT tray. I yelled, he got scared, jumped off the table, took off running and the next thing you know, I was spending two and a half hours cleaning pale yellow cat paw prints off my hardwood floors. He ran into at least three rooms before I caught him and could wash his paws off. Sorry I didn’t take any pics of that historic moment!
I hated the coral from the moment I put it up. Perhaps I’m insane. I figured it would look better if I simply did a second coat. So I did. Still hated it. Painted it yellow. Hated that too. Ended up painting 90% of my kitchen gray with a yellow area for the “cheery.” My friend hates that and wants me to change it to gray. I guess I’m being a rebel. I bought the paint and refuse to do it. Maybe next year. Too much time and paint wasted.
Then I put up sticker mosaic. The only reason I didn’t do real mosaic is I did not want to use a stone cutter and I don’t know how to do grout. The stickers are almost as expensive; however, they were very easy to put up. The backsplash behind the sink looks fabulous. The backsplash behind the oven, not so much. I’m too tired to change it. Maybe in a year…
The Kitchen Paint Jobs


Despite all the work I did in the kitchen, there was still more to be done. A former bathroom immediately off of the kitchen had been turned into a utility room. It, like the kitchen and several other rooms in the house, was painted several colors of blue. Blue walls, blue ceiling. Fucking blue, blue, blue. You know how hard it is to get a ceiling to look white after it’s been painted blue. Damn hard! Besides that, the other major problem was, I had already moved in. The “new” kitchen has the tiniest pantry known to mankind and my garage is currently unusable, so my utility room had been turned into both a makeshift pantry, work room and storage area and there is a LOT of stuff in there. Ok, I admit, I’m not known for being a minimalist, nor am I the world’s greatest housekeeper. With a full-time job, myself to take care of, seven animals to take care of, including two working dogs who both need a ton of exercise, continual repair work on my historic house, yard work, laundry, cooking, etc. it leaves very little time left over for organization. I do watch the great shows like “Tidying up with Marie Kondo” on Netflix, which my other sister Sheryl turned me onto (Thank you Sheryl); however, no matter how organized I get, it still looks messy. And I love myself and accept myself anyways, despite my imperfections. And in order to paint this room, I had to now pull all of the stuff out of it. What a hassle. I didn’t have the luxury when I moved here and purchased my home, to hire contractors and get the house all nice and fixed up before I moved in. So for EVERY SINGLE ROOM I fix-up, I moved all the stuff in, have to move all the stuff back out to fix it and move it all back in again. It’s like moving multiple times and extremely stressful. My real kitchen, which I won’t spare you photographs of during the process, was a quasi nightmare while I was painting the utility room, because all the “stuff” in the utility room had no where else to go, so I moved it into the kitchen while I was painting. And because I work full-time, it took awhile to finish the painting. In the end, I capitulated and went with Sherwin Williams Light French Gray, which also happens to be a historical color. You know I don’t like gray and think it’s drab, but gray is appropriate to me, for a utility room. I brightened the room up with a stained glass window steal from Facebook Marketplace and a lithographic print in historic frame by 1950s artist Robert Wood “Early Spring.” I love sitting at my kitchen table and seeing the colorful glass light and pretty picture juxtaposed against one another.
The Utility Room


By the time I was ready to start on my living room, I was already tired. I had done the foyer, the kitchen cabinets, kitchen multi-rounds of painting and utility room with no break. At this point, nearly a year had elapsed. Seasons were changing and when I looked at the size of the living room, just looking at it made me feel exhausted.
First, I got the opinion of three different interior designers on paint colors. Each had their opinion. One wanted me to stick to purely historical colors, the other had a very fixed idea on colors and the third was trying to lead me back towards the drab gray neutral theme. This is a historical house. She is a beauty. She has character and details no new house will ever have. And I felt strongly she should be celebrated with rich, jewel toned colors worthy of her glory and splendor. My former home in AZ had been decorated in a global/world theme, based on artifacts I have collected from my various travels. I wanted to keep a piece of that with this house, but also wanted to switch out to a more Victorian theme. In the end, I chose the Sherwin Williams Global Spice colorbook. I loved the deep, rich pigmented colors. For the living room, I chose “Cloudburst.” I’d seen it somewhere else and loved it. This was much to the chagrin of my close friend who wanted me to go deeper and darker with something more along the lines of “Oceanside.” I liked Oceanside, but I loved Cloudburst. To me it is brighter, warmer and happier and that’s the energy I wanted to bring into my house.
As I got ready to begin, I called a local contractor to get a quote to paint and fix the cracks. $1,500! It’s not that $1,500 would be expensive for most people; however for me, I just couldn’t justify a job costing $1,500 for something I now knew how to do myself. I also couldn’t pull the trigger knowing the outside of the house is where the big bucks need to go. So, back on the scaffolding I went. The ceiling had about an 8′ long crack. It was barely mentioned in the inspection report and where it was mentioned, it was mentioned solely for “HVAC” reasons. Seriously – whole ceiling cracked? And there were vertical cracks directly under both ends of the main ceiling beam, causing me to question whether the foundation of the house was stable. I called the structural engineer who had first done a report on my house to come back and recheck it. I did not want to imagine a future where that beam and entire ceiling would ever come down on me and my fur babies. He certified it was just the house shifting and that the one from the fireplace was from the heat/cool of summer/winter. Funny, because a contractor told me the exact opposite – that it was foundational as indicated by the ceiling crack, cracks under the beam, and cracks directly above each window. Who’s right and who’s wrong? I decided to trust the structural engineer, because he didn’t have a vested interest in obtaining multi-thousands of dollars fixing a home foundational issue. I feel it is so important to get information from multiple qualified parties and then in the end, listen to your own intuition on how to proceed. Sure, they’re experts; however, most of the experts also need to get paid for a living.
I fixed the cracks slowly over time, primed and painted. I even fixed additional potential ceiling cracks, used joint compound to seal peeling wall paper (yes, the ceilings across both sides of the room are wall papered), painted a coat of primer, two coats of white and then, BAM, the white looked like two different colors in some areas. I think the wallpaper absorbed the primer and paint in different ways and I could not, no matter how hard I tried get it even. So I did what I did in the foyer, threw in the towel and invested in some elegant styrofoam tiles, which look like tin ceiling. This time, I had learned my lesson and upgraded and paid the extra $2/tile to have them pre-painted.
The only thing I didn’t have done was re-sanding and revarnishing the hardwood floors. In fact, the floors throughout the entire house are problematic. Once you move in, besides having to move everything back out again, I would have to figure out A) where to find the $10-$15K to do them and B) how to keep all of my pets off them in the process. It’s rather discouraging to not be able to do all the upgrades and restoration to the house I want. Hoping I will be able to afford / figure it out some day in the future.
I finished the room off with antique lights acquired from all over the states of Indiana and Ohio, and stunning 120″ Blackout Faux Silk Taffeta curtains from HalfPrice Drapes in Golden Spice. I love these curtains so much, I ended up buying some version of them for nearly every room my house. They look 10x more expensive than what they cost and enrich all the rooms I put them in.
The Living Room


With the momentum going strong, I was itching to get finished with the first floor of the house and start on the second. Around the same time, a friend of mine at work told me about a couple of young guys that worked for a painting company who were looking for outside work at reasonable prices to earn some extra income. After surveying the dining room, small hallway and downstairs bathroom, I decided to hire them to paint so I could move on to the harder work (stripping wallpaper, fixing plaster cracks and various side projects – cause you know, there wasn’t enough to do, so I had to give myself some side projects. This was right before COVID began so I told the guys – take the work while you can get it, we don’t know where this pandemic is going to end up. I’m sure, with so many people stuck at home, those two kids got rich that spring/summer.
For the dining room, I went with Sherwin Williams “Framboise” from the same Global Spice Color book. I also decided to paint over a top strip of flowered wallpaper above a picture hanging rail to make it look like I had really wide crown molding. I also moved the light from the dining room into the kitchen and bought and installed a proper chandelier. I was lucky enough in my antique shopping to find a late 1800s marled walnut dining room table and chairs in near perfect condition from one of my favorite New Castle antique stores MTB Discounts. I immediately set out to have custom glass with beveled edges cut by Crystal Glass for the table top so no critters could scratch it. Still love how this room turned out.
The Dining Room
")
")
")
")

I’ve been told by people way smarter than me, that the downstairs bathroom was the original kitchen to the house. It makes sense. It has a far bigger cupboard / pantry than my kitchen has. It even has its own porch and exit door. Who would’ve built an outside door to an inside bathroom? So the bathroom was converted from a kitchen and a new kitchen added. Too bad they didn’t bother to insulate my kitchen! That thing gets boiling hot in the summer and all winter averages about 53 degrees in there!
The hardest part about painting the bathroom was deciding to 1) Remove the wallpaper. 2) Keep it (afterall, someone had put in a lot of effort to stain a 1990s wallpaper to make it look antique) or 3) Paint over it. My sisters and mom liked the flowered wallpaper. I did too at first, because it was so unique. But the more I looked at it, the more I felt it aged the room and made it feel “little old granny” to me. I wanted my energy, my infusion into my home and a fresh new perspective. I also thought about the huge amount of work the front foyer delivered when I removed the wallpaper and found all the floor to ceiling plaster cracks underneath it. I decided to paint the bathroom.
While the painters painted the bathroom Sherwin Williams “Plum Brown”, I worked on making curtains. The windows already have vintage shades covered in lace (probably vintage JC Penney) and I couldn’t find the exact curtain style to go with the room. I ended up ordering embroidered velvet from Ali Express, waiting three months for it to arrive and then sewing it into curtains. I bought my Rod Desyne curtain rods on Hayneedle. I left the ceiling the tannish bronze color it was already painted in, and now that shipping is finally opening back up with COVID getting somewhat under control, hoping to add more decorative ceiling tiles to this bathroom ceiling sometime in the next year or so. I’m going to use antique bronze painted tiles. Can’t wait to get them and finish up this room.
The Downstairs Bathroom


Once I was finished with the bathroom, I started on the downstairs hallways. There is a small hallway leading from the bathroom to the kitchen, a hallway at the bottom of the stairs and then the stairwell itself. I figured I could do at least paint the first two in a weekend. Right? Wrong. The first small hallway wasn’t too bad. The ceiling had been painted yet another version of blue. Someone in this house REALLY LOVED BLUE. There were at least a half dozen variations of some sort of blue or another. This ceiling happened to be a midnight blue with little stars stenciled on. I kind of liked it; however, it didn’t match the theme of any of my new colors I was using. Having learned my lesson the hard way, repainting the kitchen ceiling so many times, I decided not to go to battle on this one and just repaint it another dark color. So I pulled in the plum brown from the bathroom adjacent to this hallway. I chose Sherwin Williams Canvas Tan for the hallway and stairwell walls. They were originally a dark tan and I wanted to lighten the space (and energy up.) Painting the small hallway wasn’t too bad.
When I got to the bottom of the stairway, I again grappled with keeping the old wallpaper as part of the historic preservation of the house or taking it down. It was starting to peel in some places, so that made my decision for me. I didn’t want to do all this work, just to have the wallpaper decompose on me. Right below the hall sconce light, there was a Vintage Mermaid Cove Seaside Inn Shell Thermometer. It matched the wallpaper, so for the first year or so that I was in the house working on the main floor restorations, I just left it there. I never thought to wonder why the former owners would leave decorations up and just assumed it was because it matched the wallpaper. Nope. Another lesson learned. When I started to strip the wallpaper off, I found electrical wires poking straight through the wallpaper, with no box, definitely NOT up to code. I nearly had an anxiety attack on the spot. Had I been living in a fire hazard my first year in the house?
I immediately called my friend’s husband who is an electrician to come over. When he heard the situation, he came quickly. It took a long time going through the myriad of wires strung through the basement to find the end of them, but the good news is, the wires weren’t “hot”. They weren’t live. But still, it worried me that whoever had done the rewiring had done such a shitty job and didn’t do it to code. I began to be far more careful as I poked through walls.
The wallpaper itself was another story. Although it was starting to peel, it resisted my every effort to get it down. I used Downy mixed in extremely hot water and sprayed it down to loosen the glue. While better, it was still a real bitch to come off, breaking into tiny little pieces and took me at least four days on just this one little area. You know how it goes though, once you start (thinking of that string again), it’s pretty hard to not continue. I am tenacious and I am resourceful, and there is no way in hell I was going to let a “little” wallpaper get the better of me. Lots more swearing ensued, especially when I realized that the newly moistened wallpaper, was adhering to my hardwood floors as it dried, creating an entirely new disaster. Nope, I didn’t put floor coverings down. Didn’t even think about it. Will not make that mistake again.
In the end, it turned out nice: cleaner, brighter, more modern and yet true to the vision I have for the home.
The Hallway


The hallway stairs leads to the second floor. I was officially done with the main floor, minus some ceiling tile work that I want to do for the downstairs bathroom when I have the right budget. I decided to start on the upstairs bathroom next. The standing sink just didn’t provide enough storage or “getting ready in the morning” space, and the mirror was hung so low that I had to bend down to look into it. Initially, I thought I could pay to get this bathroom remodeled. My co-worker recommended that I talk to her talented friends at Inland Design. I stopped by and spoke with them in person and asked what kind of budgets they work with. They told me they work with any budget, large or small and to let them know when I was ready to begin. So I eventually either emailed or filled out an online form and let them know I had, what, at the time, I thought was an appropriate budget of $5K. Months went by with me leaving multiple messages and no returned phone calls. I mean seriously people, if you’re just looking for the $20K and up gigs, then don’t tell your walk in customers that you’ll work with any budget, because clearly, when you learned how small my budget was, you couldn’t even be bothered to return my phone call.
I finally capitulated, took a deep breath and decided I’d have to just take my time, pace myself and go room to room for the 2nd floor. The walls in this bathroom and ceiling both looked like ocean waves or the sand you walk on, on the beach. They were rolled and dented and imprinted. They were far from flat due to how the bathroom was poorly extended by previous owners. (The ceilings used to come down at an angle to the floor.) So rather than fight against it, I did the best I could removing super stubborn wallpaper where I could, sanding and putting down a thin layer of joint compound, sanding again and again and then administering a great bathroom wall paint color, which I love: Farrow and Ball Stone Blue. Along the way, I had to battle toxic black mold under the bathroom window, peeling oil paint and more large wall cracks. I also repainted the clawfoot tub and radiator using Rustoleum Metallic Paint & Primer spray paint in “Aged Copper.” When done with that, I re-did the ceilings with faux tin Kensington Garden Styrofoam tiles from Decorative Ceiling Tiles.
The part of the bathroom that bugged me most (besides the masculine, useless architectural vanity), was the floors. All that was there was substrate/sub-flooring. It looks like particle wood or something. But the big expense would be removing the sink, the toilet, the radiator and worse, a very heavy claw foot tub. The bathroom is small, the hallway is narrow and the stair case is steep and narrow with a turn. I didn’t want a crew of 6 guys trying to get the clawfoot tub down out into the garage while working on my bathroom and I certainly didn’t want it sitting in the hallway for months on end while I did the renovations that I wanted. So I compromised. I went to Etsy and bought these fabulous Blue Lisbon floor sticker tiles from Koko Art Shop to put down until I was ready to make the commitment on time and expense to put in a new floor.
It took awhile, but I found the world’s most perfect vanity on Facebook Market Place. It came from this former governor’s mansion in Ohio that suffered major damages from a flood. It took some hardcore negotiation skills and enduring a bidding war to get it, but I was bound and determined to have it. I found a gorgeous antique cupboard at my all time favorite Caldwell Antique Mall. I also found my new vanity mirror on FB as well and bought the antique sconces from Ebay. I got my super cool and elegant Peacock print shower curtain from good old Target. I finished the whole look off in vintage Hollywood Regency style with decorative gold bathroom vanity items. The entire makeover cost less than $1,000, including installing the sink and sconces. Screw you Inland Design. I love my new bathroom and I did it MYSELF and saved thousands of dollars! And you didn’t get one red cent of that money because you couldn’t be bothered to return my inquiry! So there.
Upstairs Bathroom


After the upstairs bathroom was done, I moved onto the laundry room. This room is essentially two rooms: the main part of the laundry room and a small walk-in closet. Both were somewhat of a nightmare. I tackled the main part of the laundry room first. There, I faced many more wall cracks to be repaired and another unruly ceiling with the ugly blue paint color. Ugh. The wallpaper on the ceiling was starting to come down, but it had been adhered with glue or taped and painted over so many times that it was nearly impossible to get it off. I’d say that during a full weekend’s worth of work on it, while the blood was draining out of my arms raised over my head, I got maybe 20% of that darn paper off. So I resorted once again to the faux tin Kensington Gardens decorative ceiling tiles. After fixing the wall cracks and doing a terrible job sanding down the joint compound, (no seriously, this will never be my profession), it was time to paint. This time, I chose the super popular Sherwin Williams Sea Salt. I love, love, love the end result. It is a nice light, almost sage gray green and makes my laundry room look light and bright. The original paint was a darker sage and, while probably a nice color in its day, made my laundry room look dark and dingy, so this was a wonderful upgrade. For the window dressing, I turned once again to Half Price Drapes, because I’m in love with their blackout faux satin drapes. They worked so well downstairs, I decided to stick with the theme for most of my upstairs rooms. I didn’t have to do anything with the floor. It has gray linoleum down. I don’t love it, but it looks fine. Someday, when I have the budget, I will have the floors throughout the house professionally done.
The Laundry Room


It may not look like it; however it took weeks to do the laundry room, so I wasn’t exactly inspired to do the laundry room closet. I had to scrunch down in there for hours and hours to try to peel the old peeling paint, wearing my N95 mask, praying I wasn’t being continually exposed to asbestos and other toxins. Near the entry way, the bottom plaster was completely and totally rotted out. It had basically turned to sand and was giving way. I was too tired at this point to take photos of that part of the job, but this tiny little room took me as long or longer to repair than most of my larger rooms. It was easier to paint, I’ll give it that, but boy am I glad it’s done and is now a useful closet that matches the rest of the laundry room. One thing I’ve learned in this process is – you simply can’t do it all at once. I wanted my whole house done – at once. Since that wasn’t possible and since I have been doing all of this work in my “spare” time (basically nights and weekends), I learned when to slow down and take breaks so that I wouldn’t hurt myself. And although I’m proud of the work I’ve done, I cringe now when I see some of my earlier work, because my skill has improved significantly over time and through experience from everything I’vie done to-date. The one thing I have not done in this process is give up. Have I gotten frustrated, angry, lonely, tired? Yes, but I just continued to push through, little by little and as I look at these photos, I am amazed at what a single woman could accomplish in such a short period of time. I don’t say that to toot my own horn, rather, I say it to inspire people who think they could not take a project like this on. You can if you’re willing to do the research needed and put in the elbow grease. The sweat equity and small investment I’ve made fixing my own house has paid dividends in REAL $$ equity value.
The Laundry Room Closet


The next room on my to do list was my spare bedroom. Really wanted this room done so I could have guests. When I first started it, I thought it would be an easy weekend job. Some priming and painting. From a distance, the room looked to be in good shape. For one, it was one of the few rooms that has flat walls. Someone, at some time, must’ve put dry wall over the plaster. No other room in the house has walls as smooth as this one. Of course, that was wishful thinking. For starters, there were a couple of very long cracks. You couldn’t really seem them from a distance, because they weren’t as deep as some of the other rooms. However, cracks, deep or not, require joint compound and sanding, which I’m not very good at. The closer I inspected the room, the more that thread pulled and pulled.
The second issue was that it looked as though there had been some kind of major dormer/window leak. Why wasn’t this in my inspection report? If only I could go back and re-negotiate from the beginning. Unfortunately, it was far too late for that. I had to take the plaster all the way back to the lath, re-plaster, plaster a 2nd coat, joint compound, sand, joint compound a second coat, prime, paint, paint a second coat. It’s a lot of work and time, because you have to wait for the the layers to dry.
The teeny tiny little closet (were people 100 years ago dwarfs? No one my size could ever deal with a closet this small!), turned out to be a massive problem. The pipes to the radiator go through the closet and again, it looked as if there had been another major leak. Again NOT in the inspection report. For starters, the plaster 2″ inches up all around the base was rotted away. It was gone! All though the original floors are pine, back in the day, they actually TARRED them down with black tar and linoleum to keep the draft out. So this little closet had at least 50 year-old linoleum in it. Not only would I expose myself to asbestos by pulling up the linoleum, I would also be exposing myself once again to black mold. One look and you could see that the linoleum looked like it was covered in black mold. How much does an N95 mask help with this? Who knows. I’ve lived at least half my life so what was I going to do, leave it like that and keep mold flowing through the house or treat and abate? I chose to rip up the linoleum and treat the black mold.
The paint was also peeling like crazy in there – and did I check the paint for lead? No, I scraped it down and repainted. Guess sometimes you gotta take your chances. That stupid little closet was almost as much or more work than the rest of the bedroom itself. And then once again, I had to deal with the ugly, ugly blue ceilings. Those require primer and a couple coats of paint so the blue doesn’t bleed through to the white. In the end, the room took weeks and weeks to fix, versus the one weekend I had idealized about. I decided to make the room a soft feminine look. Being indecisive about paint, I didn’t even research it. I went with the #1 voted Sherwin Williams bedroom paint – Romance. I went and got the little cardboard square, put it up to the wall and thought, this is a very nice light peach color! The trouble with those squares and the final paint is that the squares ALWAYS seem to be lighter than the final paint color. The color came out more of a darker rosy peach. Wish I would have gone with Intimate White instead. It still looks nice, but not the way I wanted it. Well, too bad. Too much more work to do to repaint it, so it’s staying as it is. It still looks pretty though don’t you think?
The best bonus of all is that I found a 9’X13′ wool, hand woven European rug on Facebook Marketplace. It was a great deal because it had some damage on it. Turns out the rug is French Aubusson. Original rugs in this size in perfect condition command prices of $20,000 to over $100,000. Not joking. Look them up for yourself! Gonna hang onto it, let it brighten the room and when Covid is done and antique prices are back up, look into what I can get for it. Fingers crossed.
The Spare Bedroom

")
")
")
")
")
")
")
")
")
")
")
")
")
")
")

")
")
There is a tiny room upstairs, about half the size of a small bedroom. Am assuming it used to be a babies room or something. If I didn’t have pets or a need to work from home, I’d turn it into a GIANT walk-in closet. Oh, how I would love to do that. Unfortunately, this room needs to play both the role of dog room and office. For the first year or so I lived here, I left it really plain and used it solely for the dogs. When COVID hit, I found myself using my dining room as an office, and who wants a laptop, office gear, monitors, cords everywhere in their dining room? No one. So I started about on the plan to transform this room.
This is one of the few rooms I knew I would need help with. It looked like someone who was in a spiraling rage took some kind of sharp tool and jabbed the heck out of this room. Thousands and thousands of indents everywhere. They sure wanted that wall paper off bad. Problem is, they repainted without filling the damage. And they painted it not one, but THREE different colors of blue! Blue ceiling and two different blues on the walls. HOLY SHIT. SO MUCH BLUE. WTF?!
I hired some close friends of mine to come and fill the holes with a thin layer of joint compound. I so wish I had taken a photo the day they were sanding it off. They both looked like they worked at a flour factory. They were covered in joint compound and there was at least an inch thick of it on the floor. They did an amazing job though and I am so grateful I have people in my life willing to help. This historic neighborhood community I live in has helped me so much. From jobs like this one to moving various pieces of furniture, pet sitting and more. And I am very grateful.
For color, I decided to bring up the Plum Brown from the downstairs bathroom for the bottom half of the wall and wanted a nice light “goldish/tannish” color for the top. I was at Sherwin Williams for probably an hour trying to choose the top color. I didn’t want to get it wrong. The friendly folks that worked there recommended that I go with Sherwin Williams Coriander Powder. I did. It looks nice and once again, I wish I had gone one shade lighter. However, the end effect is a beautiful and dramatic Victorian style office which is usable, pretty and which me and my dogs love.


The Master Bitch – errrr Bedroom
Why did I title it the Master Bitch? Because this room was a culmination of all of the other work I’ve done over the past 2.5 years combined. Like some of the other rooms, at surface level and from a distance, it looks fine. But laying in bed, the 2nd or 3rd day in the house, I noticed there was something significantly wrong with the ceiling. I wasn’t sure what, I just knew it didn’t look right. There were plaster cracks EVERYWHERE! Dozens and dozens of cracks. Only one or two of these were listed on the inspection report and they were labeled “cosmetic” or “HVAC repair need.” The inspector clearly did not look closely at this ceiling. Like my starting point in the foyer, the plaster was deflecting down. It also looked like a giant 8′ x 8′ “table” of sheetrock had been put up and that looked like it would fall down. I called a couple contractors to look at the room and one told me to move out of the master bedroom immediately, that it was imminent that this ceiling was going to come down. His budget to fix came in high, as contractor fees do. I had just exhausted myself setting up the bedroom and the rest of my house and the absolute LAST thing I wanted to do was take it all down, move my furniture out of the room and go sleep in the spare bedroom. For one, there was no place to put the furniture and I sure as heck wasn’t going to pay someone to move it back downstairs where I could trip over my bedroom furniture in my living room. So, I did what probably many owners of old houses do. I ignored the recommendations and decided to take my chances. If the ceiling were to fall on me as I slept, well, then, let it be.
A very wise friend of mine told me to end mark each of the cracks with colored chalk and date them so I could tell if they were growing. That was a great idea and something that initially gave me peace of mind.Two months later, in December of 2018, I was again staring up at the plethora of ceiling cracks and noticed, yes, they were already growing – longer and wider. I marked and dated them and this was the point I first contacted a real estate law attorney. Actually, I contacted two so I could get a second opinion, because I started to feel like possibly the former homeowners, the real estate agent and the inspector were all in cahoots to sell the house. There were just too many things that were not disclosed.
Unfortunately, Indiana is a buyer beware state. Both attorneys told me that it could take years of legal battle to prove the former homeowners were trying to cover up damage to sell the house and that even if I could prove it, if they didn’t have cash, I’d lose thousands and thousands of dollars in lawyer fees trying to get them to pay to fix the issues. You have two years after you move into a house to try to resolve pre-existing conditions.
I gave up. I decided that wasn’t the path I wanted to take. I live in a small community and I didn’t want my next few years focused negatively on people I would see around. I instead focused on what I could do to fix the house. The thought, however, of fixing that bedroom ceiling and the cost were so high, I was overwhelmed and procrastinated and put it off for, well, two and a half years. I must have some fabulous guardian angels, because the ceiling didn’t come down on me. It should have. I have two obnoxious dogs, one of whom has no off switch who likes to jump off the bed onto the floor and land with a thud – over and over and over again. I would’ve thought that shaking alone would’ve brought the ceiling down, but thank God it didn’t.
It took me TWO and a HALF YEARS to pull my head out of my, er, the sand to be open to fixing it. I waited until every other room in the house was done first. That was my process. That’s what I needed to do to take care of myself and prepare myself for what was to come.
First, I had to move all the furniture out. The upstairs part of my house is small. The hallway is narrow, the rooms are small and there was no place to put more stuff. Yet I figured out how to pack all my bedroom stuff into the hall, into the laundry room, into my office, into my spare room so that I could work on that room. I lived like that for months and months. It was awful. It was claustrophobic. Stuff everywhere. No organization. My home is my sanctuary. It is the place I want the most peace and instead, I had to live in chaos in order to fix that room.
I started with what I thought would be the easy part first: taking down the wallpaper. Nope, this wallpaper had been painted over, and re-adhered with so much glue it did not want to come down. After two solid weekends of scraping until I thought my arms were going to come off, I bought a steamer. I had to do a multi-step process on every single section of wall:
- Spray wallpaper with hot water and Downy to get it to relax
- Start scraping
- Steam wall with steamer
- Start scraping
- Spray wall with more hot water and Downy
- Scrape some more
- Steam again
- Scrape some more
- Steam again
- Scrape some more
- Go back over all the same walls, spray down again and this time, scrape and clean wallpaper glue off
- Spray, remove glue, spray, remove glue
- Sand, sand, sand, sand
- Fill holes with joint compound and plaster repair…
You get the picture. It took weeks to get the wallpaper off. Then I got to sand the walls, fill zillions of holes with joint compound, sand them again – just to prep to have the walls professionally skim coated by someone else before they could be painted. The closets were also a nightmare. Paint peeling everywhere. Had to scrape those down also.
I decided before pulling up the puke green rug, to have the ceiling and walls professionally done at the same time. initially, we thought we could get away with simply skim coating everything. But sure enough, when the guys got to the ceiling to see what was going on, the part that was deflecting the worst, yes, the part right over my bed, started coming down on them. They had to open the ceiling to figure out what was going on. Not only was the plaster coming off the lath, the lath coming off the joist – the JOIST ITSELF was coming down. That whole ceiling could’ve collapsed at any time. Geez. That was not smart to wait so long to get it fixed. Fortunately, the plaster guys knew what they were doing and went and got the wood and rebuilt that part of my ceiling for me. They re-secured the joist to the support beams, re-secured the lath, re-plastered and then still skim coated it. What a mess and what a relief. I am so grateful for people who work in the trades. Those two guys had to be inhaling toxic dust, a concoction of black mold and asbestos. Neither wore a mask and neither cared. They were black with grit when they were done and they just chalk it up to that being part of the job. Thank you guys. You saved my life. Literally.
When the ceiling and walls were finally done, it was time to trash the trashed puke green carpet. I was just hoping and praying that when I pulled that baby up, I would have wood floors underneath. And I did, sort of. Like the small closet in my spare bedroom, the master bedroom had old linoleum glued down to pine with tar. Both closets had this and I decided to tackle those and sand that mf’ng tar off. What a bitch. Master bitch. But the rest of the floor had parquet floors. Wood, not pine, but a beautiful honey maple color. I was sooooo happy. At first. I thought the house had finally given me a break. Finally. Nice floors. Not too much work (besides the closet floors.) I would just have to remove all the carpet, pull up all the carpet staples and carpet strips and clean the parquet and shop for a nice room sized rug.
Remember that thread? Pulling the thread. Well, when I got 3/4 of the carpet pulled up, I got to a spot that LITERALLY looked like a dead body had been laying there for weeks and weeks. The parquet was rotted all the way to the pine sub-floor. Even the vinyl and tar underneath were worn down. YOU CANNOT TELL ME THE OWNERS DIDN’T KNOW EVERY TIME THEY STEPPED ON THIS PART OF THE FLOOR THAT THERE WASN’T A PROBLEM. Lying bastards. I place money they put that ugly cheap carpet in to cover up the floor rot. Boy was I pissed. Worse – how was I going to fix it?
So I did what I did with the rest of the house. I began binge-watching YouTube videos on how to lay parquet floor down. And you know what? Because of the COVID-19 pandemic, parquet was now very difficult to get. Most floor stores didn’t have it and if they did, it was extraordinarily expensive. After lots of research and patience, I found a some replacement parquet on eBay, that seemed to match the original. i needed to fix about a 5′ x 5′ section of floor. I went to Menards, bought sub-floor to put down and even bought the parquet floor glue, which initially, I had no friggin’ idea how to use.
The greatest issue of all though was, the rot was not even. I had to figure out how to remove it in a perfect square section, the exact size of the replacement tiles. Not easy. To do this, I had to go buy a circular saw. Me and sharp electric tools are not friends. This is the second most scared I’ve been since working in this house. I had to learn how to use a circular saw, not cut my fingers or toes off, and cut deep enough to get the parquet out, WITHOUT cutting the subfloor out. I practiced on wood in my garage. I was terrified. I hate that saw. I’m happy tools exist to get the job done you need, but I was not happy to have to use a circular saw.
But here’s the thing. I was scared and I did it any ways. Courage isn’t the lack of fear. Courage is facing the fear and working your way through it. And I figured out how to saw that old parquet out. Saw new sub-floor to put down, saw some of the parquet to fit. I figured out how to lay down parquet floor glue without getting it all over me or worse, the new parquet and I laid down the fix.
It wasn’t a perfect match, but it is so, so close. And I did it, all by myself and again saved hundreds, if not thousands of dollars.
When the floor was done, I had to go buy shoe molding and put down shoe molding. Didn’t know how to do that either. More YouTube videos. I laid down shoe molding and I painted and painted and painted. I had to do all the prep work, put down primer and then multiple coats of paint: ceiling, two closets, closet floors, baseboard, trim, walls. I’m tired just thinking about it.
In the end, it took 5-6 months to restore the master bedroom. I lived in chaos the whole time. But it was worth it. I hired the professionals for the really hard work and did the rest myself. I sold my modern furniture and bought french provincial to go with the look of the house.
I hated my bedroom before. It didn’t feel good to be in there. The one room we should be most comfortable in, was not comfortable at all. I love my bedroom now. It’s not perfect, but it is so much better. And when I’m in there, I feel like I’m in a room at a quaint B&B or European hotel. It’s me. It’s my character, my energy, my quirky taste and style. It feels good to be in there now and it feels really, really good to have it all done and my other rooms back! I conquered the Master Bitch!


The Insane Side Projects
Because I’m insane, no really, I am, in between all the renovating, when I would get tired of peeling, plastering, painting, etc. I would work on some side projects. This started originally by me trying to fix a Pottery Barn Manhattan leather couch that cats clawed the bejesus out of. I started on the couch about the same time as the foyer and before I decided to replace all my West Coast / World-Themed furniture and art with bohemian Victorian. I was originally repairing it to try to sell it and then, well, ended up donating it to some lucky person at Habitat for Humanity Restore. To-date, I’ve repaired:
- Pottery Barn Couch and Chair
- Antique Lampshades
- Antique Bench
- Duncan Phyfe Harp Back Chairs
- A whole table and chairs set, that I never saved pics of
- Myself. Why me, because I faced the unknown and worked through fear and three years later, I have a beautiful home. I am a woman who did a man’s work and saved thousands of dollars. And I’m really proud of the work I’ve done. I encourage every woman to face her fears and know she is stronger than she thinks. You can do it. I know you can!
Now – on to the OUTSIDE!
The Yard and Gardens
COMING Q4 2021…


Vicky
That is an amazing article. It really tells the whole story ! I was exhausted after reading it! You put in so much hard work and love into the project. I’m so proud of you. Your home is gorgeous and you should be commended for the beautiful job you did.